-
How to Update Fronius SnapINverter Datamanager and Firmware
For your Fronius SnapINverter (Fronius Primo / Symo) - here we recommend having the most up to date firmware so you get the best out of your rooftop solar PV system with your Fronius SnapINverter.
We recommend setting up regular Calendar reminders to review the current system firmware settings - a recommended interval for checking is annually every 12 months.
IMPORTANT: Ensure the Datamanger is updated BEFORE the Firmware is updated. Detail below:
1. Log into Fronius Solar.web (www.solarweb.com)
2. Select your solar PV system
3. Click on the Settings tab
4. Click on the Components tab
5. Begin the update process for the Fronius Datamanager. Select the Data Source and click UPDATE (Important! Wait until this is complete before proceeding to the next step)
6. Updating the Fronius SnapINverter firmware by selecting the Inverter and click UPDATE (Note this process can take up to 20-60 minutes for this process to complete.)
-
Why isn't my Powerwall charging?
When installed with PV, Powerwall is designed to charge from solar energy. If your solar system is not yet operational, Powerwall will not be able to charge. If your solar system is operational and you are in Self-powered Mode, Powerwall will charge with any excess solar that your home doesn't immediately use. Smaller solar systems sometimes do not produce more than your home is currently using. You can increase the backup reserve or switch to Backup-only, which will prioritize charging Powerwall with any solar production.
-
Why does the Tesla mobile app show power flows or values that appear inaccurate?
Power flow on the monitoring Tesla mobile app shows the instantaneous flow of power of your home energy system. On a typical day a combination of solar, grid, and Powerwall may be powering your home. Solar energy may flow to the grid when your home does not need it and Powerwall is full. When charging your Powerwall to its backup reserve level or in Backup-only mode, solar power will flow directly from solar to Powerwall while grid energy is drawn for the home.
-
Where can I find my Powerwall Gateway information?
The Tesla Gateway part number and serial number for your Powerwall Gateway will appear on a sticker on the inside of the Gateway door. Learn how to locate your Gateway information here.
-
Tesla mobile app - log in / set up / learn more
Once your Powerwall has been turned on, download the Tesla app and start monitoring your Powerwall and home energy usage.
Step 1: Log In
Log in using the same email address you used to order Powerwall with solar. If you are already a Tesla vehicle owner, log in using the same email address you use to sign into your Tesla Account.Step 2: Set Up Notifications
Receive notifications when Powerwall starts backing up your home during instances such as a power outage.Step 3: You are now logged into the Tesla app
Learn more about the features of the Tesla mobile app. You can also learn more about using and customizing your Powerwall below: -
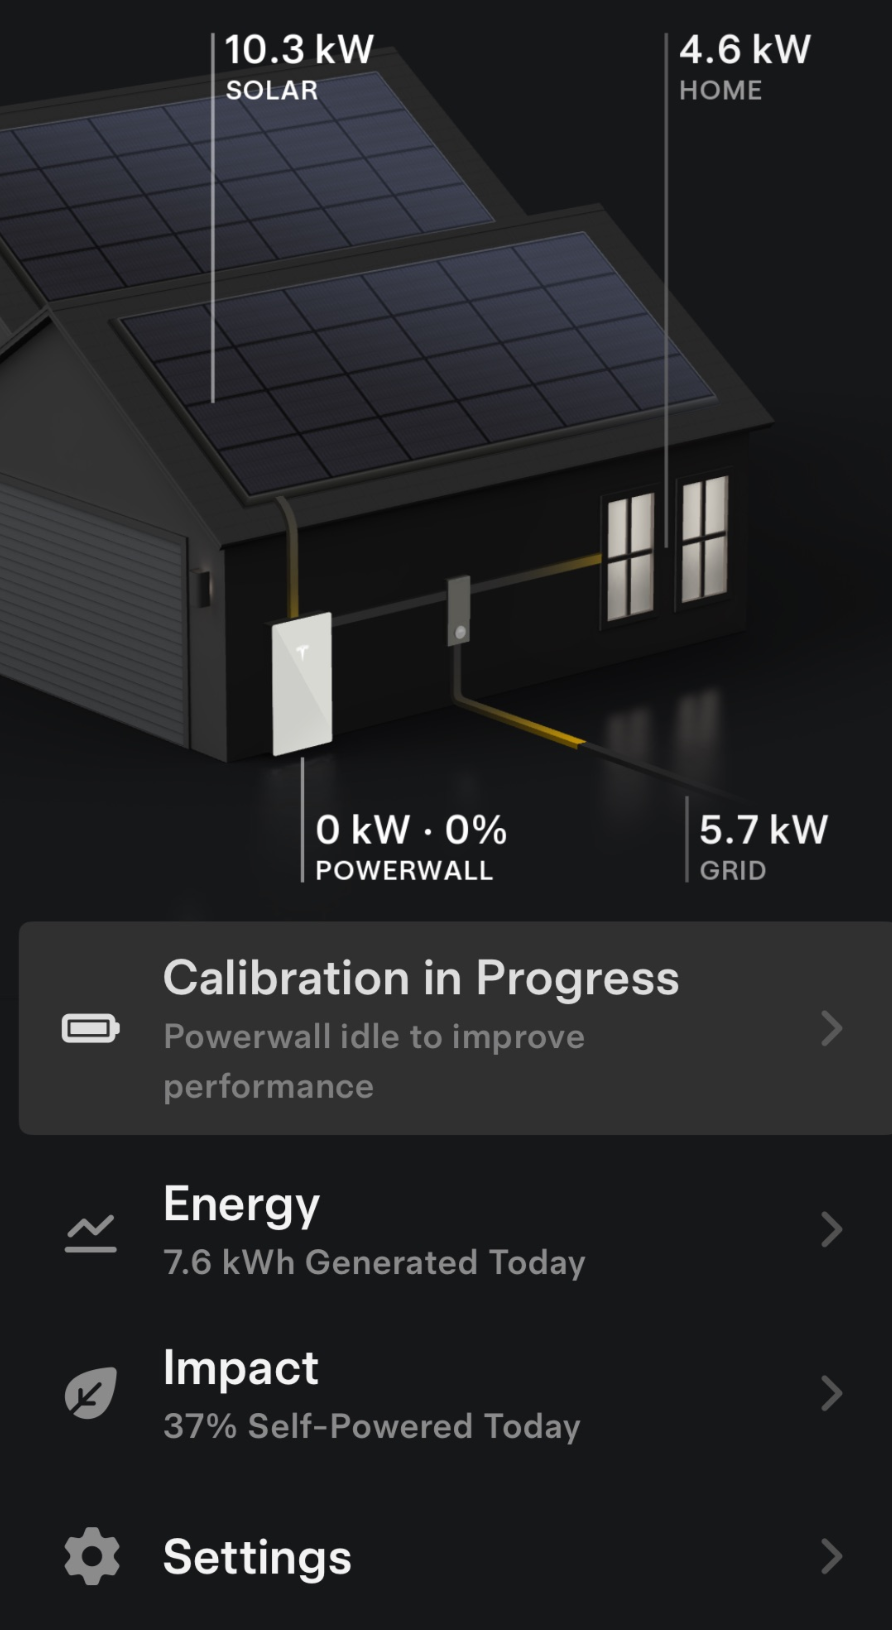
Tesla Powerwall 3 Calibration in Progress
You have a Tesla Powerwall 3 and you receive the message in the Tesla app saying, "Calibration in Progress". This appears an App Alert Banner saying, "Powerwall (charging, discharging, idle) to improve performance".
This is normal and within Tesla's technical specification for the Powerwall 3. As the battery chemistry has changed from Powerwall 2 to Powerwall 3 (LFP) - Tesla will initially require this to be done in the early stages of the rollout with the expectation for the need to calibrate to reduce over time.
Tesla advise the Powerwall 3 must periodically undergo routine calibration for optimal battery performance. Some things to note during this calibration include:
- Calibration may take up to 24 hours
- Powerwall may discharge past your backup reserve
- Powerwall may not charge from solar
- Powerwall is still ready to back up your home during grid outages
Below is an example how the message is displayed in the app.
-
How do I install my Methven Kiri Satinjet ultra low flow shower head/handset?
Here is the installation guide for how to install your Methven Kiri Satinjet ultra low flow shower head/handset
Some notes on installation:
- After installation, all connections must be checked for leaks.
- All installations must be carried out in compliance with relevant water regulations.
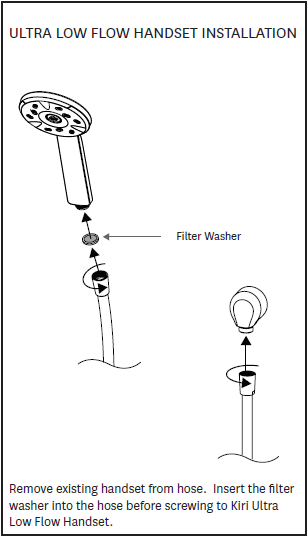
ULTRA LOW FLOW HANDSET INSTALLATION
Remove existing handset from hose. Insert the filter washer into the hose before screwing hose end to your Kiri ultra low flow handset.
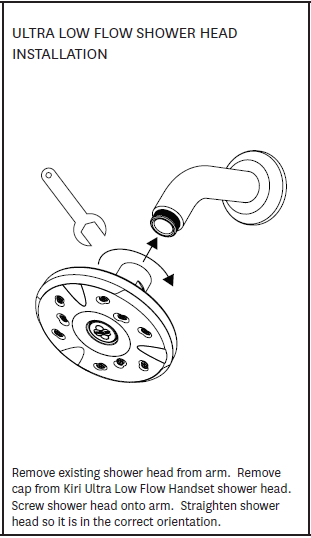
ULTRA LOW FLOW SHOWER HEAD INSTALLATION
Remove existing shower head from arm. Remove cap from Kiri ultra low flow handset/shower head. Screw shower head onto arm. Straighten shower head so it is in the correct orientation.
-
Cleaning advice for my Methven Kiri Satinjet ultra low flow shower head
How do I clean my Methven Kiri Satinjet ultra low flow shower head?
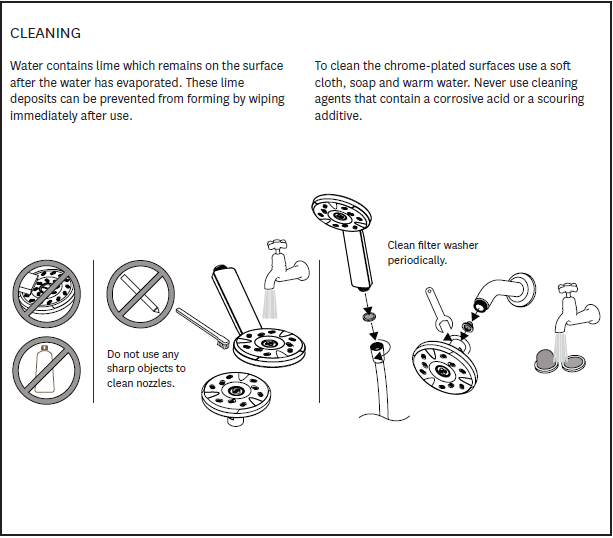
Water contains lime which remains on a surface when the water evaporates. Lime deposits can be prevented from forming by wiping the shower head surface immediately after use.
To clean the chrome-plated shower head surface use a soft cloth, soap and warm water. Never use cleaning agents as they may contain a corrosive acid or a scouring additive.
-
If the Methven Kiri Satinjet uses so little water how will I have a proper shower? How is it better than other low flow shower heads?
Older low flow shower heads simply restrict the flow of water coming out of your shower, this has lead some people to believe that all low flow shower heads are the same and produce an inferior shower experience. It is important to note that the Methven Kiri Satinjet uses completely different technology to a normal shower.
What technology you might ask?
As the name suggests the technology is called Satinjet. Satinjet technology is based on the Venturi effect, where air is sucked in to the shower head through special breather holes to create large droplets of an air/water mixture with maximum surface area for minimum volume. The Satinjet head produces 150,000 of these droplets per minute.
So instead of most of the warm water simply flowing off your skin without imparting any warmth, as it does in a normal shower, the Satinjet covers your skin in a warm cloud of smaller droplets imparting maximum warmth to you even though the flow of water is much less than a regular shower. In short the Methven Kiri Satinjet is much better and more efficient than a regular shower head, which has to drench you in water to get the same warming effect.
-
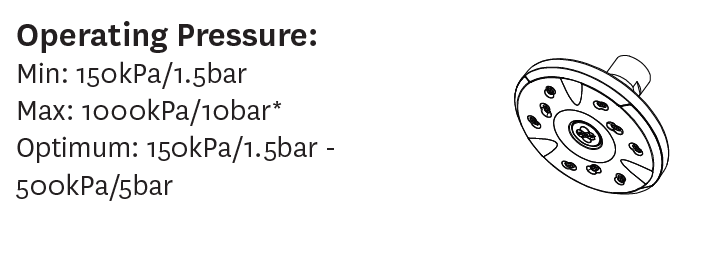
What is the lowest pressure the Methven Kiri Satinjet ultra low flow shower head can operate at?
The optimum operating pressure for the Methven Kiri Satinjet is 500kPa / 5bar. However the showerhead can operate as low as 150kPa / 1.5bar. Giving you plenty of flexibility.
info@pure-electric.com.au
1300 86 78 73